Presentation Slides & Demo Videos - Getting Saucy with APFS

I just had the honor of presenting at one of my favorite BSides Conference BsidesNOLA on the State of the new Apple File System (APFS). Sadly, I didn't have the time to go through the demos but I have uploaded them to YouTube and the slides have been uploaded to my Github, as promised.

Slides (PDF)

Mounting an APFS disk in MacOS using xmount

Mounting an APFS disk in SANS SIFT (Linux) using ewfmount

Enjoy! I hope ya'll find it useful! 

Ok Internet, Lets Test this APFS Plaintext Password Bug Properly

There has been some confusion (myself included) on what is vulnerable to this bug and what isn't. Some folks can replicate and some cannot - so I think its high time to test this properly to see what versions and scenarios are affected by this bug.

The table below is sorted by macOS version - I'm just testing 10.13.x here. (If you happen to get it to leak the password on 10.12.x please let me know.) I'm also organizing by disk formatting scenario since I believe this is where most of the confusion comes from.

APFS encrypted volumes can be created on the disk level as well as the volume level and it truly seems to make a difference. Please also test if you find (or don't find) the results in the Unified logs and/or the install.log or neither (and god forbid any other locations you might come across!). I'm also consistently using the "Erase" button versus the "Partition" button.

If I am missing a certain scenario that you think should be added please let me know. If you disagree with the current findings - also let me know (I will also expect screenshots/videos from you to be sure we're on the same page.) I have tested 10.3.3 (host system) and 10.13.4 (VM) but would love someone to sanity check me - I've been wrong in the past!) I would have done more testing on different versions but have a limited set of systems as I'm traveling right now.

I will update the spreadsheet below as necessary.

For previous related blogs see here and here.

YAY TEAMWORK!

pay attention to me cat GIF-source.gif

OMG, Seriously? - APFS Encrypted Plaintext Password found in ANOTHER (More Persistent!) macOS Log File

UPDATE: PLEASE HELP ME TEST

At some point you just need to stop looking and be blissfully ignorant...this was not one of those days. 

In and update to my previously updated blog article, I have found another instance where the plaintext password was written to system logs. This time I found it in more persistent log. This is actually a worse problem than the one I previously reported on.

The previous examples were found in the unified logs which can hang around for a few weeks, this new example stores the exact same information in the system's /var/log/install.log. I have found that the install.log will only get wiped out upon major re-installation (ie: 10.11 -> 10.12 -> 10.13), therefore these plaintext passwords will hang around for quite a bit longer than a few weeks!  I had entries dating back to when I originally installed High Sierra on this system back in November of 2017! 

Twitter user @sirkkalap, was unable to re-create what I previously reported on. I finally got some time this afternoon to re-test. As it turns out, I was unable to re-create my results from 03/24. I assumed that at some point in the past few days a silent security update was pushed out. I went to my install.log file to investigate further. As far as updates go - the only thing that has potential to be the cause of the fix is a GateKeeper ConfigData update v138 (com.apple.pkg.GatekeeperConfigData.16U1432). I have not investigated if this was the true cause. I have not updated to 10.13.4 yet, this was on 10.13.3.

During this investigations I was VERY surprised to see the same diskmanagementd logs that I had found in the unified logs. Why are they logged in the software installation log at all, I have no clue. It makes absolutely no sense to me.

Uh Oh! Unified Logs in High Sierra (10.13) Show Plaintext Password for APFS Encrypted External Volumes via Disk Utility.app

UPDATE: PLEASE HELP ME TEST

UPATE TO THE UPDATE: Similar log entries are now found in another system log that is more persistent, see the article here.

UPDATE: This is still vulnerable on current versions of macOS 10.13.3 when encrypted an ALREADY EXISTING unencrypted APFS volume (versus, creating a NEW volume in original article). Thanks to @moelassus for pointing this out and to @howardnoakley for verifying. My verification test is below. Note that it gets stored in on-disk, collected logs (non-volatile logs).

Original Article Below:


I’ve been updating my course (Mac and iOS Forensics and Incident Response) to use new APFS disk images (APFS FTW!) and came across something that both incredibly useful from a forensics perspective but utterly horrifying from a security standpoint. Screenshot below of my course disk image.

It may not be noticeable at first (apart from the highlighting I’ve added of course), but the text “frogger13” is the password I used on a newly created APFS formatted FileVault Encrypted USB drive with the volume name “SEKRET”. (The new class images have a WarGames theme, hence the shout-outs to classic video games!)

The newfs_apfs command can take a passphrase as a parameter using the mostly undocumented “-S” flag. It is not documented in the man page.

However when run without parameters, it will show it.

I tried to recreate this scenario on my current system running 10.13.3 but was unable to do so therefore I believe this bug has been addressed. I was however able to recreate it on a 10.13 system (the image screenshot above is from a 10.13.1 system.) I have not tried it on a 10.13.2 system as I do not have one easily available. I will update this blog if someone can test it for me. UPDATE: Thanks to @ranvel (screenshot) and @applechinfo (video) for testing, it has also been fixed in 10.13.2. 

I haven’t done as much testing as I would like (I’m running up against a course update deadline after all!), but I did want to get this out immediate so it can be used for various investigations. I used the following steps to recreate this my 10.13 system.

Created a “clean” flash drive formatted “Mac OS Extended (Journaled)” using Disk Utility.app. (Quick testing shows other base formats should work similarly.) It is the Kingston DataTraveler drive labeled “Untitled” below.

Next I used the menu option “Erase” to create an Encrypted APFS volume on the drive, shown below named “SECRET_USB”. (In my testing it works the same if I go through the “Partition” options and do the same general process. The “Partition” method did error out, however it still appears to be an encrypted USB drive and the logs are the similar.)

Select “Erase” and wait until it has completed.

I used the following command to watch my unified logs in the Terminal while the process above was doing its thing:

log stream --info --predicate 'eventMessage contains "newfs_"'

…and there we have it, a plaintext password! (For better or worse.)

If anyone else does further testing I would love to know the results! Send me a message on Twitter or through my contact page!

iOS Imaging on the Cheap! - Part Deux! (for iOS 10 & 11)

We got some fantastic gifts of jailbreaks over the holiday so naturally I get very excited and dove right in so I can start getting back into research for iOS 10.3+ and iOS 11. The first step in this research is getting physical access to the device and capturing data. For some background please refer to my previous article on this: iOS Imaging on the Cheap!

This article will include the jailbreaks for iOS 10.3.3 using Meridian and iOS 11 using LiberiOS. My go to for all jailbreaks is The iPhone Wiki. Always, always, always make sure you go to the legitimate jailbreak host to ensure non-compromised jailbreak software. These two jailbreaks are semi-tethered jailbreaks meaning they revert the devices to non-jailbroken status when the devices are rebooted. Both of these jailbreaks are apps that run on the device thus you will be downloading an IPA file and installing them via Cydia Impactor. Quick instructions are the following, feel free to search for more detailed instructions - they are all over the place:

  • Download IPA

  • Plug in the device

  • Drag & Drop onto Cydia Impactor

  • Input Apple ID email & password (you may need to generate an app specific password if you have two-factor turned on).

  • Install will do its thing, depending on you developer status you may need to trust the app developer in Settings.

Let’s start with an iPad Mini on iOS 10.3.3 using the Meridian Jailbreak. The jailbreak app installation process was easy, it was actually exploiting the device which took some patience. As it states in the app, it may take up to 10 times. It took me three times the first time and six times in my second effort.

Next step is to SSH into the device. This was also a bit frustrating – part of it because I didn’t read the FAQ and part because the SSH software installed on the device is not very stable.

First off the SSH port used is on 2222, not the normal 22 so be aware of that if you use iproxy like myself – you need to use the command ‘iproxy 2222 4242 (or some other port number) instead of ‘iproxy 22 2222’.

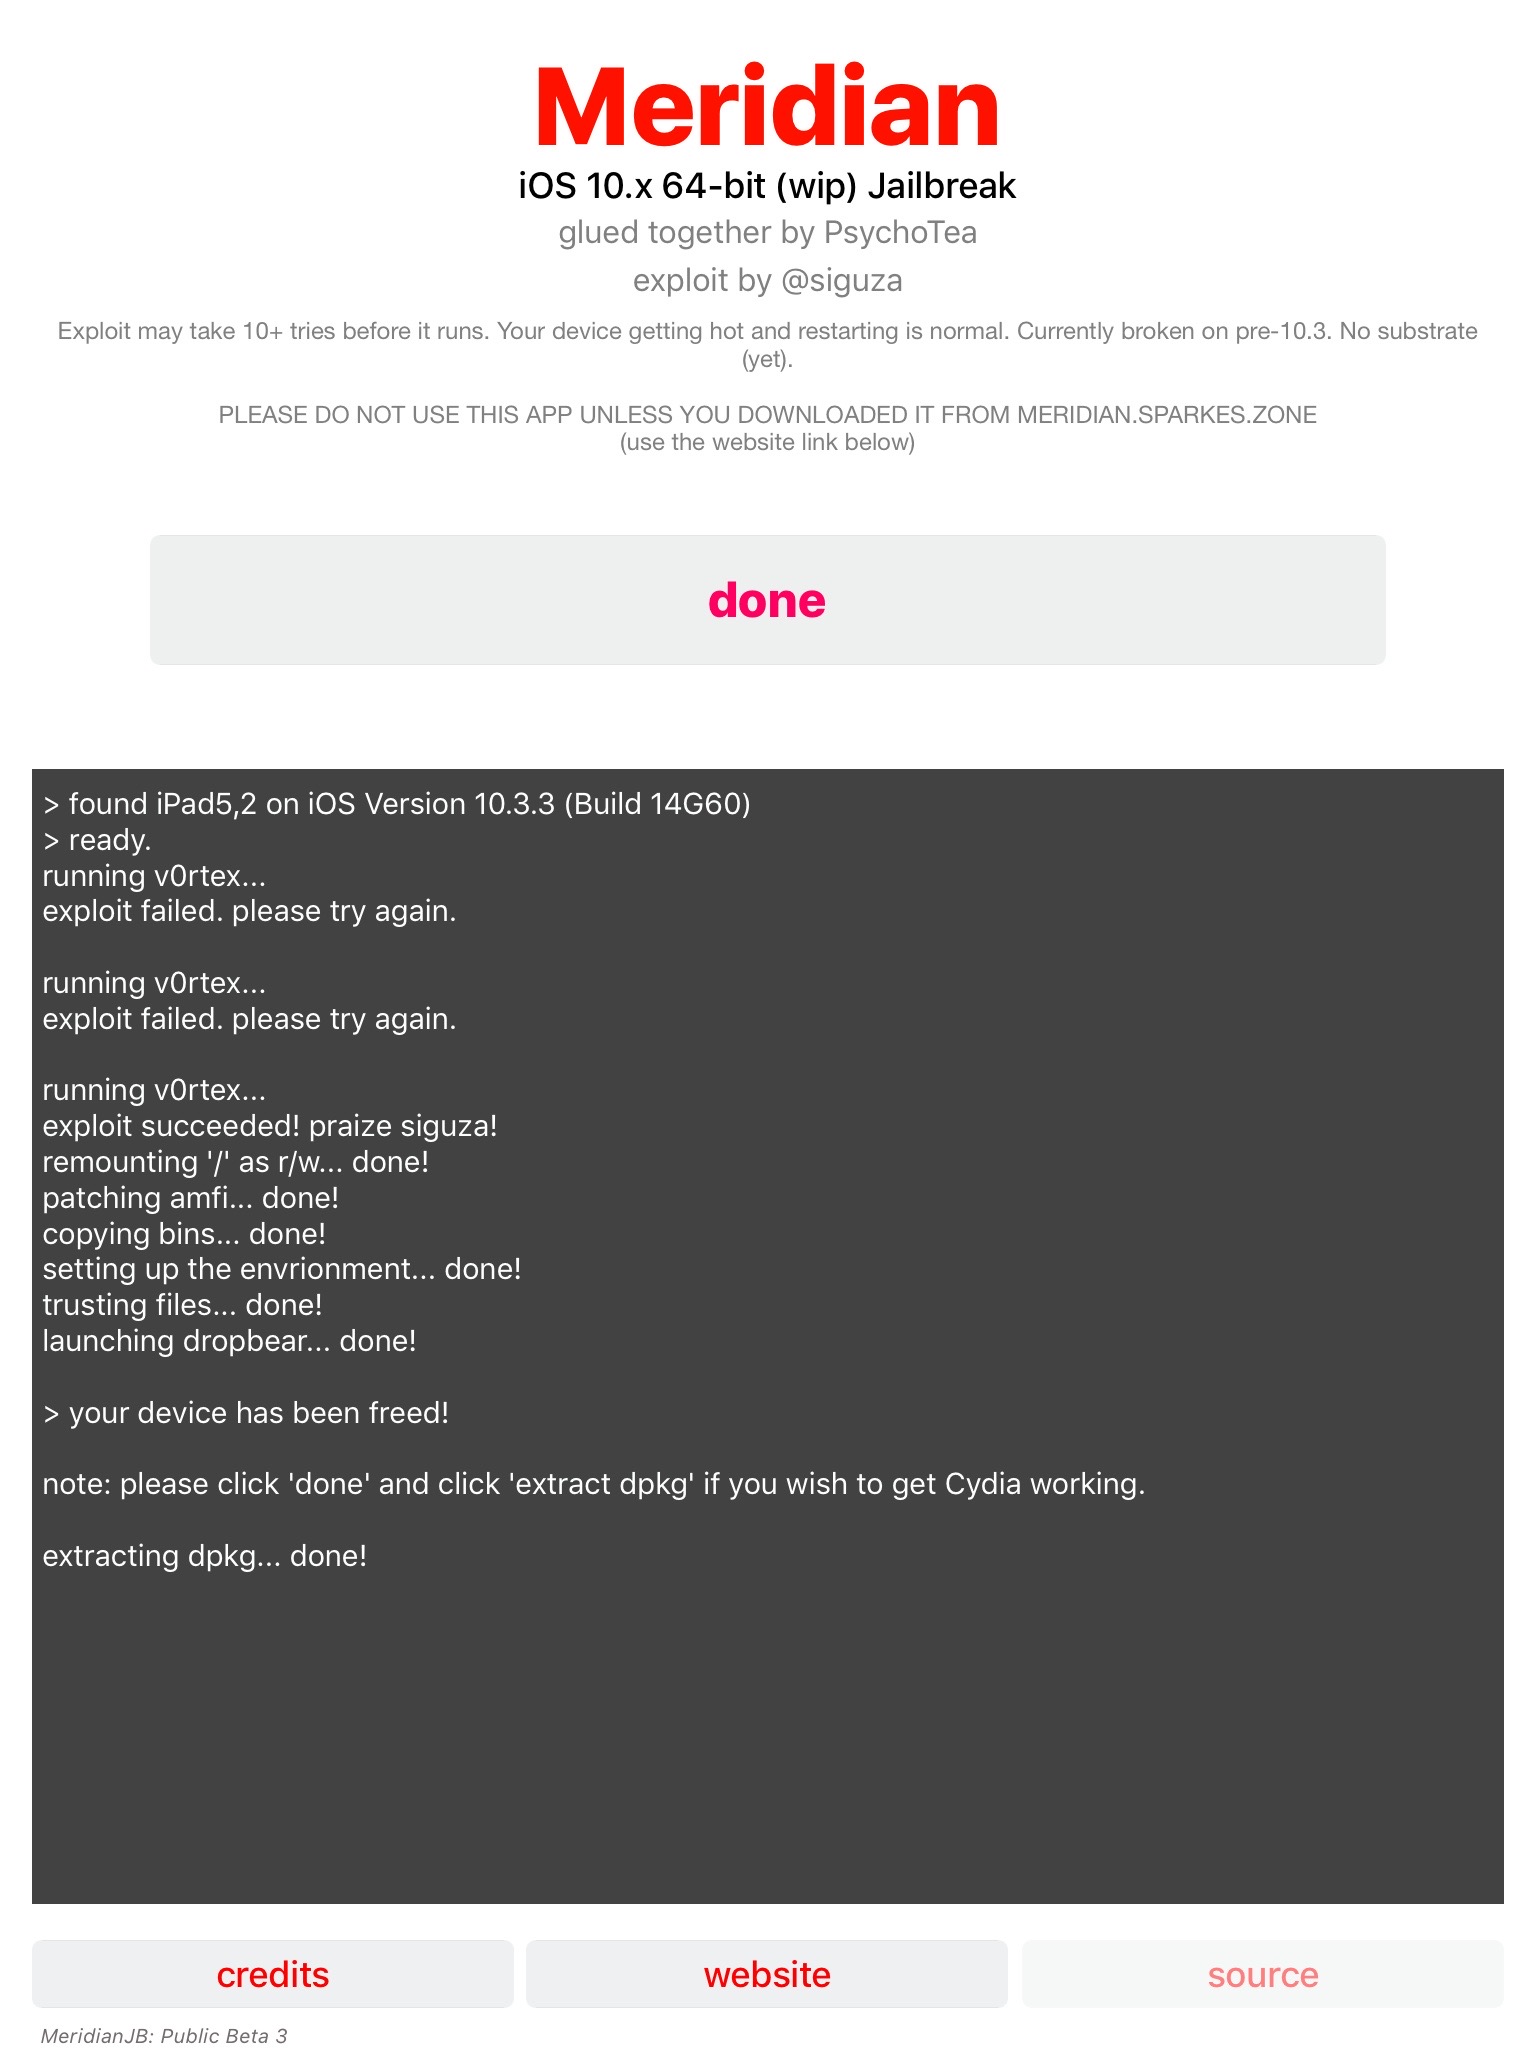
Second is the SSH software used, dropbear. I had serious issues attempting to SSH into this device. Sometimes it worked, sometimes it refused the connection. Just keep trying is my solution – it will eventually work.

Finally, once you are in be sure to change the passwords for the ‘root’ and ‘mobile’ accounts by using the command ‘passwd root’ and ‘passwd mobile’ (see the screen shot below in the next section).

To image the device you can use a modified version of the command that I used in my previous blog article (assuming you are using iproxy  for USB tethering – modify as needed if not).

ssh –p 4242 root@127.0.0.1 '/meridian/bins/tar –cf - /' > ios_physical_logical_dump.tar

This jailbreak (as well as LiberiOS) are installing their own set of binaries which include some normal Unix utilities not installed on iOS. The tar command is in a different directory than what is normally used therefore it may not work to just use ‘tar’, instead point it to the one Meridian put on the device.

Another item you may have noticed that has changed with the command above is that I’m doing a ‘physical logical’ acquisition of the entire device using from the root directory or ‘/’. Previously I would capture the system partition as a full dd image using /dev/disk0s1s1, however something with these newer operating systems is limiting my access to it. Best guess at this point is that it’s an APFS thing ¯\_(ツ)_/¯ . Shown below doing a simple 'xxd' to view the partition is not permitted as root, this also goes for 'dd' and other utilities.

While this makes me a bit sad, I can still grab a logical copy of the files on the system and data partitions in one shot by using the command above. I did have some issues with the tar command exiting and eventually just had to assume I had all the files just on the size of the tar bundle so keep an eye on it.


Next up is an iPhone on iOS 11.1.2 using LiberiOS. Installation was just like Meridian – quick, easy, and flawfless.

This jailbreak was less quirky. As with the other jailbreak you should change the password for the 'root' and 'mobile' account immediately. This jailbreak provides the following instructions when first SSH'ed into. I highly reccomend running the export command shown below.

I was able to run the same command to procure a ‘physical logical’ acquisition of the device with a slight change because of where LiberiOS puts the tar utility. Once run you might get a few errors due to files being ignored or not permitted to be captured by 'tar'. This is normal.

ssh –p 4242 root@127.0.0.1 '/jb/usr/bin/tar –cf - /' > ios_physical_logical_dump.tar

Enjoy the new jailbreaks and may your forensic research and acquisitions be fruitful! I would also like to give a big THANK YOU to everyone who worked and contributed to these jailbreaks - they really do help with forensic research!